Anyone who knows my history will know that one of my strings was Flash developer. The browser wars (part 1) made me tire of the hoops and loops and misinformation that used to come out of all the browser manufacturers camps. The graphical splendour of flash in web applications lit the fire of the internet and dragged it away from tables and lists to interactive entertainment.
We all know what happened next, and you are welcome to whatever theory fills your proverbial bucket. Needless to say, I hadn’t touched flash for a few years, with it being persona non grata, in the burgeoning mobile space, and by extension the chugging along web space.
I had used it in the past to export sprite sheets and the like, using it in the same fashion as it was originally designed, as an animation tool, but the HTML5 support was sketchy, as Adobe had nothing to replace the Flash engine with.
It seems Adobe is now in cahoots with Interactive Industry veteran Grant Skinner to embed createJS, which is his management wrapper over Canvas, DOM and WebGL, into flash by default. Removing all the messy cartesian maths, trigonometry and graphical hoopla in much the same way jquery changed the DOM for javascript developers.
In this mini tutorial I’m going to show a simple pipeline from asset to createJS. This isn’t meant as anything but an example, and not a template for project work, so use at your own risk.
The tools I will be using are Flash CC (flash 13), a web browser, and a text editor. I’ll show how to create an asset in Flash, publish it to createJS, and then how to interact with it indirectly.
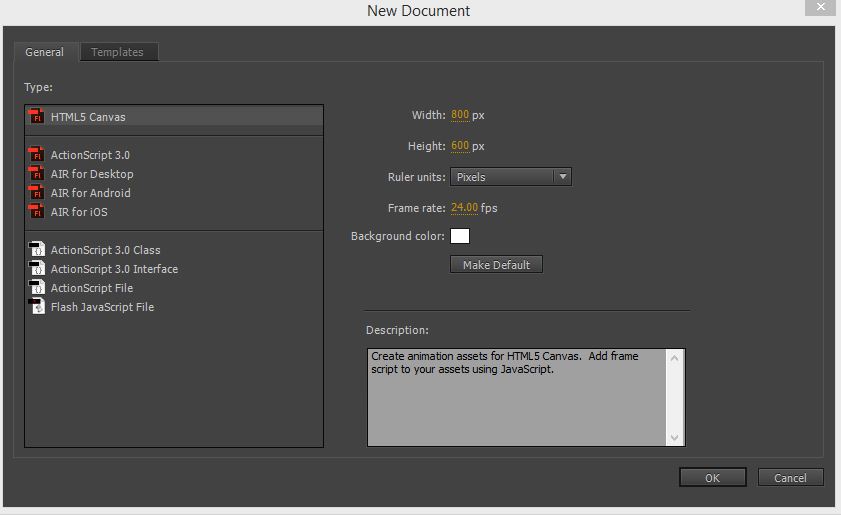
In flash, create a new project using the HTML5 canvas template, with a width of 800 and a height of 600. This is just so we have enough space. It doesn’t relate to the size of our finished piece.
Leave the frame rate at 24fps. Note: Make Sure you keep your framerate noted, or planned out before hand, as we will use it with createJS. Mismatched frame rates can cause animations to run at a different speed than expected.
I’m going to draw a simple sprite, which has several animations. In this case, a balloon.
Firstly, I create a blank movieclip called balloonClip in the library. Then I add some animations and keyframes with labels.
I’m going to give it a looping 24 frame floating animation and a 10 frame pop. I add labels to the animation which we will be using in createJS.

The balloonClip object will be made available in the createjs script.
Now, we create a simple webpage to hold the clip.
<!DOCTYPE html>
<html>
<body onload="createJSExample();">
<canvas id="createjsexample"></canvas>
<script>
   function createJSExample() {
       var canvas = document.getElementById("createjsexample");
       var stage = new createjs.Stage(canvas);
       createjs.Ticker.setFPS(24);
       createjs.Ticker.addEventListener("tick", drawLoop);
       function drawLoop() {
           stage.update();
       }
   }
</script>
<script src="https://code.createjs.com/createjs-2014.12.12.min.js"></script>
</body>
</html>
This is a very simple createJS template, with a drawLoop to handle stage updates. Every game or interactive piece has some sort of regular drawLoop or interrupt, which handles state changes in objects, such as a bullet, or cloud, and collision detection, etc.
Now we do a customary run of the page to make sure we have no typos. You can add a console.log to the drawLoop if you want to see it being hit by the tick event.
Back to flash!
We should have an empty screen with our balloon in the library.
Animations in flash will always loop, so we will need to put in redirects in the label layer to ensure the balloon doesn’t just run through to pop.
Add a gotoAndPlay(“float_start”) to the end frame of your floating animation. I’m not going to get into flash development here, I’m going to assume you know what I am talking about when it comes to using flash..
That script will tell flash to go back to the start of the animation and keep looping. We can test it by doing a quick publish.
Flash will convert your animation into createJS and save it in the same folder as your FLA file.
If your animation wasn’t dragged onto the main scene prior to publishing the corresponding javascript file will be fairly empty. If it was on the scene then your code will contain lines similar to this.
// Layer 2
 this.shape = new cjs.Shape();
 this.shape.graphics.f("#FFCC00").s().p("AiTCiQg9hDgBhfQABheA9hDQA+hDBVgBQBXABA9BDQA+BDAABeQAABfg+BDQg9BDhXAAQhVAAg+hDg");
 this.shape.setTransform(-18,-155);

 this.shape_1 = new cjs.Shape();
 this.shape_1.graphics.f("#FFCC00").s().p("AiTCiQg+hDAAhfQAAheA+hEQA9hCBWAAQBWAAA+BCQA9BEABBeQgBBfg9BDQg+BEhWAAQhWAAg9hEg");
 this.shape_1.setTransform(-19.2,-154.3);
The numbers and letters are simply compressed representations of your movieclip’s vectors.
Let’s take the JS file created and place it next to the web page created earlier, then reference it with a script tag.
Now lets add the code to show the balloon to our webpage.
var balloon=new lib.balloonClip();
stage.add(balloon);
The name in the lib object will be the same as what you called your clip in the library in flash.
Add the clip, and the createJS movieclip script to the HTML, so we can see the balloon in all its marvellous glory! 🙂
<!DOCTYPE html>
<html>
<body onload="createJSExample();">
<canvas id="createjsexample"></canvas>
<script>
   function createJSExample() {
       var canvas = document.getElementById("createjsexample");
       canvas.width=800;
       canvas.height=600;
       var stage = new createjs.Stage(canvas);

       var balloon=new lib.balloonClip();
       balloon.x=200;
       balloon.y=250;
       stage.addChild(balloon);

       createjs.Ticker.setFPS(24);
       createjs.Ticker.addEventListener("tick", drawLoop);


       function drawLoop() {
           stage.update();
       }
   }
</script>
<script src="https://code.createjs.com/createjs-2014.12.12.min.js"></script>
<script src="http://code.createjs.com/movieclip-0.7.0.min.js"></script>
<script src="balloonAnimation.js"></script>
</body>
</html>
If all went to plan, you should see your balloon bouncing around on the screen, rendered in canvas by createJS.
Now, we can add a button to pop the balloon.
Add the following code to the web page, just under where you declare the x and y position of the balloon.
var circle = new createjs.Shape();
circle.graphics.beginFill("red").drawCircle(0, 0, 10);
circle.x = circle.y = 10;
circle.name = "circle";
stage.addChild(circle);
//pop you!
circle.on("click",mouseEventHandler);
Now add the listener, under the drawLoop function. This will check to see what frame the movieclip is on, and act accordingly.
function mouseEventHandler(evt){
    if(evt.type=="click"){
        if(balloon.getCurrentLabel()=="pop_end"){
            balloon.gotoAndPlay("float_start");
        }else {
            balloon.gotoAndPlay("pop");
        }
    }
}
If all went well, you should be able to pop, and recreate the balloon using the red dot.
It’s great to see Grant Skinner flying the flag for flash, and taking the best features of Actionscript to create a much better transition to Javascript, and the support for WebGL will only add to the fun times ahead.
Javascript is still nowhere near as fast as flash, but we’re getting there! 🙂
Code is available on my git:
https://github.com/neilhighley/nh-examplecreatejs